| View previous topic :: View next topic |
| Author |
Message |
MG Man
Zorce Klingon Warrior

Joined: 19 May 2005
Posts: 2683
Location: usually on the back page
|
 Posted: Mon Dec 19, 2005 2:16 pm Post subject: Posted: Mon Dec 19, 2005 2:16 pm Post subject: |
 |
|
since Narend gettin on bad wid he Rotary self, ah ask him to post some pics for meh...jus some random suspension shots....multi-link with panhard rod and torque tube......
_________________
 
I know it's so, for I told me so |
|
| Back to top |
|
 |
MG Man
Zorce Klingon Warrior
Joined: 19 May 2005
Posts: 2683
Location: usually on the back page
|
| Posted: Mon Dec 19, 2005 4:10 pm Post subject: |
|
|


_________________
I know it's so, for I told me so |
|
| Back to top |
|
|
MG Man
Zorce Klingon Warrior
Joined: 19 May 2005
Posts: 2683
Location: usually on the back page
|
| Posted: Tue Dec 20, 2005 12:24 pm Post subject: |
|
|
comments?
_________________
I know it's so, for I told me so |
|
| Back to top |
|
|
horsepwrjunki
Budding Solodexer?

Joined: 06 Apr 2005
Posts: 425
Location: at d first last street,up de hill down the second left, up the right, upstairs *knock first plz*
|
| Posted: Thu Dec 29, 2005 9:47 am Post subject: |
|
|
steda supsension yeo.. drooolllllll
kev can that car spin liek the mg.. if so.. can i beg a ride.... call me as soon as the lancer back up an runin cah could come an help pull spanner...
________
Yamaha Rd500Lc History
Last edited by horsepwrjunki on Sat Feb 12, 2011 3:22 am; edited 1 time in total |
|
| Back to top |
|
|
MG Man
Zorce Klingon Warrior
Joined: 19 May 2005
Posts: 2683
Location: usually on the back page
|
| Posted: Thu Dec 29, 2005 11:00 am Post subject: |
|
|
spin? man I still cyar pelt dat car into ah corner cuz it does swap ends like two drunk lezzies in ah girls gone wild video!
_________________
I know it's so, for I told me so |
|
| Back to top |
|
|
horsepwrjunki
Budding Solodexer?
Joined: 06 Apr 2005
Posts: 425
Location: at d first last street,up de hill down the second left, up the right, upstairs *knock first plz*
|
| Posted: Fri Dec 30, 2005 8:20 am Post subject: |
|
|
WHHHHHHHOOOOOOTTTT... so waht about the rest of my statment.. lol.. doh fraid to call meh to help out nah..
________
Volcano Vaporizer
Last edited by horsepwrjunki on Mon Mar 07, 2011 4:47 am; edited 1 time in total |
|
| Back to top |
|
|
MG Man
Zorce Klingon Warrior
Joined: 19 May 2005
Posts: 2683
Location: usually on the back page
|
| Posted: Fri Mar 03, 2006 1:54 pm Post subject: |
|
|
latest update...........
Tools bought for this project so far:
Engine Crane: $1,300
Gear wrenches: $1,000
Helicoil Kit: $450
Additional tools: $600
Work done this weekend:
Finally got the damaged exhaust bolt hole repaired with the helicoil kit, so that's good to go
Degreased the engine a bit using HS Degreaser cuz I cannot find Simple Green anywhere
Degreased engine bay in preparation for repaint
Changed timing belt
Hoping to have engine bay repainted this Sunday
With Dex on the 12, I probably won't get the engine instaleld until April 2, when I find some time to spare. If all goes well, the engine will fire up and the car will be rolling. Once that's done, next step is to rebuild the brake calipers, tune carbs, replace plugs, plug wires, points, condenser and oil.......with any luck, she'll make it to the dyno to see if I can improve over my last pull.......in the meantime, I have shocks and springs on order from UK, standard HSR front springs and Spax adjustable dampers, cuz the original Bilsteins too ex$$$pensive.......then some new tyre$ and hopefully I will be able to unleash its wraith on dex for 2007
_________________
I know it's so, for I told me so |
|
| Back to top |
|
|
MG Man
Zorce Klingon Warrior
Joined: 19 May 2005
Posts: 2683
Location: usually on the back page
|
| Posted: Mon Mar 06, 2006 2:41 pm Post subject: |
|
|
work done this weekend:
had engine bay repainted, along with snoot.......looks great
Cost $150 labour, $280 materials
_________________
I know it's so, for I told me so |
|
| Back to top |
|
|
MG Man
Zorce Klingon Warrior
Joined: 19 May 2005
Posts: 2683
Location: usually on the back page
|
| Posted: Sun May 14, 2006 9:47 pm Post subject: |
|
|
so I grinnin like a monkey whole evening..............why?
guess........................... (Thanks Crix!!!!!!!!!!!!!!!!! )
_________________
I know it's so, for I told me so |
|
| Back to top |
|
|
NarendZORCE
Zorce Editor-in-Chief

Joined: 04 Apr 2005
Posts: 3137
Location: In Zorce, usually after the contents page
|
| Posted: Mon May 15, 2006 11:16 am Post subject: |
|
|
FINALLY!!!!
_________________
Drags, Circuit, Solodex, Rally, Karting, the Shows, the Girls, the Car you drive...
ZORCERs done know... the speed lifestyle magazine in the Islands, ZORCE
Click to hear it >> http://www.zorce.com/fortheforums/Zorce15NEW.mp3
Download & SEE iT! >> http://www.zorce.com/fortheforums/Zorce-15.mp4
...........................................................
Oh Yeah! Feel the Rush, it's like... WOW!
May the (Mass x Acceleration)-F+Z be with you... |
|
| Back to top |
|
|
MG Man
Zorce Klingon Warrior
Joined: 19 May 2005
Posts: 2683
Location: usually on the back page
|
| Posted: Fri May 19, 2006 10:36 pm Post subject: |
|
|
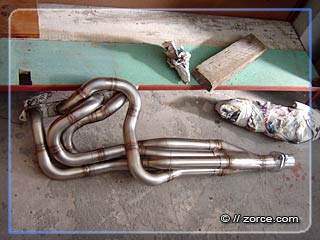
The HSR exhaust installation is nearly complete. All that's needed now is to fit the collector box and reattach the tailpipe. I've put some pics together to document the whole thing.
These pics compare the original 26 year old mild steel manifold with the new stainless steel example:


_________________
I know it's so, for I told me so |
|
| Back to top |
|
|
MG Man
Zorce Klingon Warrior
Joined: 19 May 2005
Posts: 2683
Location: usually on the back page
|
| Posted: Fri May 19, 2006 11:08 pm Post subject: |
|
|
This set covers the removal of the old manifold. The mani basically consists of four seperate pipes that feed into a collector box. Removal with the engine in place requires the removal of the collector box and backing off of the manifold bolts. With the four pipes free, they can be removed one-by-one.............
The catch is, the pipes are intertwined, and the engine mount runs inside the mass of bends.....worse yet, the collector was rusted solid to the four pipes.
The collector box was freed by using a dremel and cutting wheel to slice incisions that could be peeled back to free the four pipes. Once the collector was removed, the front anti-roll bar was slackened to make room, and the radiator was also removed.....
The reason the pipes were wrapped is that they were porus and weak...the warp served to minimise them rubbing and vibrating against each other.....


The next series of photos show how tight the clearance is......this was partly because the negine mounting was compressed to about 2/3 its thickness due to it supporting most of the engine weight, as well as being surrounded by the exhaust pipes........the bolt in question only gave about 1/4 turn each time.........once it began to back off, it got harder to reach


The engine mount needed to be slackened to give some wiggle room. I managed to round off one of the bolts, and had to use a bolt extractor tool to get it off (thanks Sanctifier!)...........since i=this was the underside of the engine, I had to tape the bolt extractor to the spanner! Eventually, a bit of wiggling, banging and cursing saw all the pipes fall out, finally free.....most manuals say 'installation is the reverse of removal' riiiiiiiight


_________________
I know it's so, for I told me so |
|
| Back to top |
|
|
MG Man
Zorce Klingon Warrior
Joined: 19 May 2005
Posts: 2683
Location: usually on the back page
|
| Posted: Fri May 19, 2006 11:24 pm Post subject: |
|
|
Final Installation
Unfortunately I did not have the camera when Madcrix hepled with the reinstallation. After weeks of frustration at trying to do the job alone, it only took us two hours to get the job done. Small wrists and a new engine mount definitely helped!
The installation sequence went something like this:
Install # 2 from below but do not bolt in place
Install #4 from front, slide around engine mount and bolt on loosely
Install #3 from the front and hold all pipes in place from below
Remove forward stud for # 3 pipe to get some extra clearance
Instert stud and tighten up loosely against # 2 and #3
Install #1 from the front
Once all pipes are in place, tighten all five nuts
Installation was definitely made easier thanks to the use of Gear Wrenches (thanks Inshan and Jahling!) At US$80 for a set, its definitely worth the investment.....since this engine has BOTH metric and imperial bolts, I needed TWO sets


_________________
I know it's so, for I told me so |
|
| Back to top |
|
|
MG Man
Zorce Klingon Warrior
Joined: 19 May 2005
Posts: 2683
Location: usually on the back page
|
| Posted: Mon May 22, 2006 9:45 pm Post subject: |
|
|
all I need to do now is fit the collector, run a new exhaust pipe, refit radiator and relevant hoses, refit alternator, connect clutch cable, double check wiring, and she ready to start
Then is to rebuild dizzy and carbs, replace plugs and leads, and hi-ho, hi-ho, off to the dyno I go, ZORC8 in hand 
_________________
I know it's so, for I told me so |
|
| Back to top |
|
|
Banzai
Zorce Media Crew

Joined: 22 May 2006
Posts: 31
|
| Posted: Mon May 22, 2006 9:50 pm Post subject: |
|
|
| good read thus far man.... |
|
| Back to top |
|
|
|
|
|
|
You cannot post new topics in this forum
You cannot reply to topics in this forum
You cannot edit your posts in this forum
You cannot delete your posts in this forum
You cannot vote in polls in this forum
|
Powered by phpBB © 2001, 2005 phpBB Group
|

