| View previous topic :: View next topic |
| Author |
Message |
Banzai
Zorce Media Crew

Joined: 22 May 2006
Posts: 31
|
 Posted: Fri Jul 03, 2009 10:20 am Post subject: Project "Restore Hope" Posted: Fri Jul 03, 2009 10:20 am Post subject: Project "Restore Hope" |
 |
|
its been in the works for nearly one yr....been teteteing from 4 different engines.... finally settling on a power plant that most ppl wd say "naaaaaaaaaaaaaaaaaaaaaaaaaaaaaah man!!! after all of that?"
Here goes. Started off as a 2WD Evo project in 2006. Bought one of the first K20a's to land in the country thru ANP. Paid (hold on to yuh jammies) $12K for it. Yeah KEs....hahahahaa its true. Sold it becuz i wasnt too keen on going the "tried and tested Honda way".....we sold it to a guy in Princess town who put it in a 4 door honda sedan .....then we bought the engine from Sanjay (Spindoc) and proceeded to start work...only to find out (then due to lack of knowledge) that the 2wd mitsu box would not have stood up to the kinda power we was looking at. Then came the Toyota 3SGTE..personally my fave out of all th engines due to its base power and upgrade capacity but............space being the issue..we would have had to cut the Firewall to fit it in....was too close for comfort and we aint even begin to talk bout "engine movement".......pondered on a H22R (yeh EL JEFE.....waaaay b4 you did urs.....had a link i Jamdown to get one) and then we was goign thru the bamboo one day...saw a Pulsar N15 VZR front cut for the amazing price of 10K and that was that........ESSSS ARRRRRR here we come!!
(see's hoardes of ppl leave the room in disgust....some laughing (mostly honda men)).
So here's the build. No secrets being held from anyone. Draw your own conclusions but we'll only know when the dyno charts come up.
Its a "SR-kenstein". SR16 Head with and SR20VE block and using the SR16 pistons. Because of the ratios we want, we keeping the SR16 box. Thats it really. the "tweaks" of it i wll go thru as we build.
decided to take some pics of th progress...these shots are post first install. we did the install but was not satisfied with how th engine was sitting. And even MORE disappointed with how the bone stock SR16 ran. I am yet to understand how Lucino owners say its sooooooo "great"......the engine lacks serious torque.

The issue with the engine bay of th Rover is its space...limited isnt the word i would use. What i specifically wanted was to use the stock rover mounts and make adapter plates/brackets to the engine.

what yu are seeing there is the right side top engine mount. We initially built it using Alen keys for easy mounting and dismounting....but Karl (head engineer) did some stress tests on the Allen Key bolts and found them to be poorly suitable for the application. So we had Arnold (the master behind the Medusa Head build) build the adapter brackets as if it was "from factory"

thats the left side mount. THe battery floor pan has been removed (Location in the trunk) and that area will be the air box area. We going with a different material, and we located a place in FL that does custom Carbon Fiber boxes to order.....and at a good price as well. Again, sturdiness is the name of the game, so Arnold paid detail to the mounting points of the mount.

The Rover is as light (if not lighter) as a EG Hatch. that said, i always found that the handling of the car was in question (even with the 1800VVC lump). Karl did his investiquiring and found that it was necessary to move the front cross member forward and downward to get the tightness of the handling. Remember this is not a straight line project...none of my cars are. i love the maracas run and it must stand up to those rigours.

Thats the bottom Engine mount thats going to connect with the sump pan of the engine.

this is the "contraption" that the guys are building to mate the repositioned cross member which we dropped and moved forward. thats the right side. They doing mock ups before the cutting is done.

the left side....yes that the infamous SR16 Gearbox. really sweet thing. Havent used a box thats so smooth in gear changes as yet.

thats it for now. I'm looking for a good brake upgrade but keep it within budget. I spent 8K on brake upgrades for the VR4....not planning on spending that much on the Rover project. |
|
| Back to top |
|
 |
Banzai
Zorce Media Crew
Joined: 22 May 2006
Posts: 31
|
| Posted: Fri Jul 03, 2009 10:21 am Post subject: |
|
|
Engine bay space....ive spoken to other owners who have doen the SR swap in rovers and they all had to chop th cross memeber to make it fit...only the CA18 does not require choping. The engine bay is not that great as it was compact for th Rover 1.8.
in this pic, the cross memeber is to your left....normall its higher and futher back to where the gearbox housing is right now...most installers chop that member in half to get the engine to fit...
Wher it is now its the same level as the Rover engine would be. It could be an issue of perception |
|
| Back to top |
|
|
Banzai
Zorce Media Crew
Joined: 22 May 2006
Posts: 31
|
| Posted: Fri Jul 03, 2009 10:22 am Post subject: |
|
|
right...
bit of an update. collected the N1 cams tonight as well as the valves and valve retainers. Still awaiting the N1 intake. All these parts are on back order (much as 3 months) s oyuh just hadd apay yuh money and wait. I'm still looking for either R34 or Silvia front brakes to upgrade in the front. Have to collect the Rover ZR Tail fin and LED tails for the body.
Im looking for a set of these.

have a set of TE37's that i wouldnt mind trading along with cash for.

thats about it. All machine work is done. The machinst and i nearly coem to blows over th position of the nissan shifter as im going with the Nissan bit instead of the Rover.
(talking that...i have 2 PG1 boxes for sale....1800 a piece).
thats all for now...pics soon come. |
|
| Back to top |
|
|
Banzai
Zorce Media Crew
Joined: 22 May 2006
Posts: 31
|
| Posted: Fri Jul 03, 2009 10:22 am Post subject: |
|
|
^^ been having discussions about that...and it came to form when we moved the car from the machine shop to the engine shop. I didnt drop the car in any way, and te ecr was still bottoming out due to the lower mouting. So we had to modify to accept alot more forces than we first thought out...
th ZR fin is like this one....with the built in LeD's
 |
|
| Back to top |
|
|
Banzai
Zorce Media Crew
Joined: 22 May 2006
Posts: 31
|
| Posted: Fri Jul 03, 2009 10:23 am Post subject: |
|
|
cudnt resist......some pics


 |
|
| Back to top |
|
|
Banzai
Zorce Media Crew
Joined: 22 May 2006
Posts: 31
|
| Posted: Fri Jul 03, 2009 10:24 am Post subject: |
|
|
Bottom end built pics...
the piston with the Rod is the Sr16.....notched Courtesy Karl..without the rod you widnt know the difference...

most of the other shots are standard. Fidanza 8lb Flywheel with Fidanza Clutch and Pressure plate setup.
other things to include the Engine mount/Axle holder make up. Arnold really did some good work fabricating the engine mount to fit the original Rover Position and yet fortify the Engine sump.

We also had to remove the "Scraper" from the Sr16 sump due to the use of the SR20 Crank. As you know, the purpose of the scraper is to remove any excess oil from the Crank lobes thus reducing the "extra" Centrifugal forces from the "throwing oil. YOu will notice we removed it.
thats that. Next is the head work. I've got some parts to clear with...in fact i think we're building a separate SR20 with the Sr16 cams and selling it. Head and BLock. |
|
| Back to top |
|
|
Banzai
Zorce Media Crew
Joined: 22 May 2006
Posts: 31
|
| Posted: Fri Jul 03, 2009 10:27 am Post subject: |
|
|
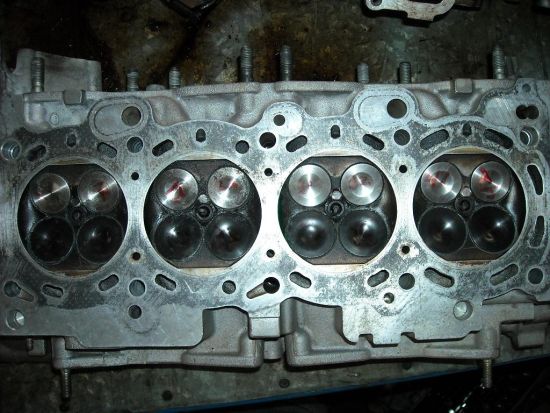
more photos...note the SR16 "scraper" we removed....
          |
|
| Back to top |
|
|
Banzai
Zorce Media Crew
Joined: 22 May 2006
Posts: 31
|
| Posted: Fri Jul 03, 2009 10:29 am Post subject: |
|
|
some old pics..
ahh boi!!!....i tihnk this was the last time she ran at drags..beat up some SR tweeny's good that day....


 |
|
| Back to top |
|
|
Banzai
Zorce Media Crew
Joined: 22 May 2006
Posts: 31
|
| Posted: Fri Jul 03, 2009 10:30 am Post subject: |
|
|
project update...car back from the body shop...new wing installed, running on the TE37's.....for now. Stillhave to clean out interior, install seats, aftermarket CF mirrors, and other "Stuff"...
Head came back from Baldwin's all nice and shiney!! will post that update shortly...

Yakuza.....Chk PM....(grins..)
 |
|
| Back to top |
|
|
Banzai
Zorce Media Crew
Joined: 22 May 2006
Posts: 31
|
| Posted: Fri Jul 03, 2009 10:31 am Post subject: |
|
|
mock up of the intended shoes (Volks is for Dex...)

Tenzo R's Mach10...... decent weight for a 17inch rim. Comes with Ray Valve Stems and Ray Lug nuts. Both Red.
suspension wise,, im using Spax SSX lowering sports springs. Lowered the car 45mm measured against original ride height when the car was new.
Good travel thus far. NOt too stiff but a solid ride. Wouldnt really know until i put the car through its paces on a Toco run. |
|
| Back to top |
|
|
Banzai
Zorce Media Crew
Joined: 22 May 2006
Posts: 31
|
| Posted: Fri Jul 03, 2009 10:32 am Post subject: |
|
|
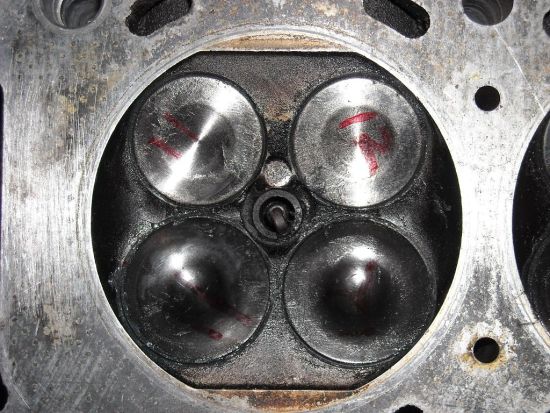
Head came back from Baldwin's all nice and shiney!! will post that update shortly...
BEFORE
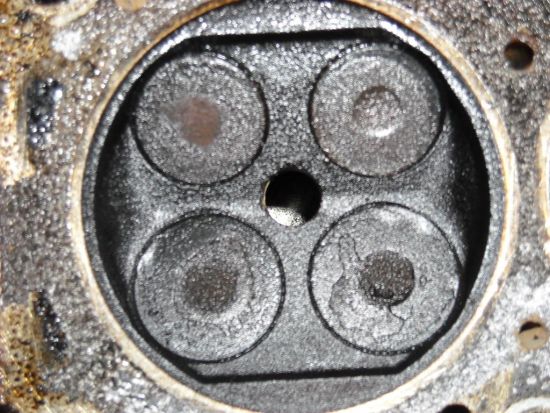
AFTER
 |
|
| Back to top |
|
|
Banzai
Zorce Media Crew
Joined: 22 May 2006
Posts: 31
|
| Posted: Fri Jul 03, 2009 10:33 am Post subject: |
|
|
collected the brakes this afternoon...yall know my fixation with Big brakes. Will haveto do some "body work" to them. My can of Chinese Laquer Red is waiting along with Heat Gun and fresh decals.

appliying them to the Avenir rotors. Many thanks to Robert Dow for the link up!! |
|
| Back to top |
|
|
Banzai
Zorce Media Crew
Joined: 22 May 2006
Posts: 31
|
| Posted: Fri Jul 03, 2009 10:33 am Post subject: |
|
|
Today we did the work on the calipers and installed them....something to note. dont rush this proces...let the paint bake properly onto the surface before installation...we ended up smuding one of the calipers and almost destryed the beautiful work that we started last night into today doing.

The Avenir Rotors really worked well for this application. MAy upgrade to Powerslots later on....Pity the budget doesnt allow for big rear brakes. We also installed the braided brake lines. I swaer by them for teh Ox build...im going back with them for this build.
Some Cosmetics. Richbrook Gear knob.

Also installed the Sparco Pedal set. Had to strip of th rubber soles of the stock units cuz we had to drill holes thru the pedal.

once drilled we used the bolts with self locking nuts (great idea by Sparco) and it fit pretty well.

Only issue i have with it is that the curvature of the Sparco pedal is no way near the sotck curvature of the pedal itself...

Got an "Japanese Learners Driver" sticker. Hey..i learning to drive agian we!


so that's that for now. Getting back the seats from the Fabricator on Monday. |
|
| Back to top |
|
|
Banzai
Zorce Media Crew
Joined: 22 May 2006
Posts: 31
|
| Posted: Fri Jul 03, 2009 10:35 am Post subject: |
|
|
Got the Seats back from the Fabricator this afternoon. Dude did the work WITHOUT using a Jig, something that I was concerned about. He fabricated new bases for the runners to sit on..

Even re-attached the SRS module for the airbag system back to its original place.

Only when we put the red against the Green today we realized how contrasting the red was. Really bright.

Passenger seat was instaleld first. Number of things to notice. Unles you look really closely, the mounting rails look "stock". Also, We have to do something about the rest of th interior to compliment the Seats. The Red piping while its in the accent color is not the red we thought would've compliemented the Seats. So we contacted Luis Rohal (works for Bavarian Motors. His expertise is in restitching leather) to do it.

bit of a brighter image to bring out the contrast even more.

Driver seat next. Did an excellent job with what i wanted. I wanted the neew driving position to be a tad lower and backwards than the Original Rover seats. Those seats gave you a "Turbo ERF" feel. Needed a more snug position to drive. (thais big head Karl Edwards you seeing there, Tech Lead of the project).

Seat installed (no adjustments made.)

Final positioning of the seats... From this angle you can see what i was referring to WRT the contrast. Because the car has so mush glass in its Bubble shape, you'd findthat the Red cuts the visual flow of the interior. Getting a brighter tone of Red for the rear seat piping will help solve this.
thats it.

We have to purchse an OEM timing chain as we've been gettign reports of SR16"Stein" builds breaking the chains under high revs and sometimes destroying the cam in the process. NOt taking that chance. Once that is done, the head will be locked and we move on to doing the "wireless" install.
 |
|
| Back to top |
|
|
Banzai
Zorce Media Crew
Joined: 22 May 2006
Posts: 31
|
| Posted: Fri Jul 03, 2009 10:37 am Post subject: |
|
|
choices choices. I want a clean look of the interior. It musr scream "Stock/Production"...but yet have that taste that says "personal touch"...
Im leaning towards this. (....number one..)

or

or
 |
|
| Back to top |
|
|
|
|
|

